
iTeleCenter Online Navigation |
● Click the Home option to go to the iTeleCenter Home Page.
● Click the Video Directory option to open the Online Help Video Directory.
● Click the Help option to open the Online Help.
● Click the Account Management option to manage your billing information for your iTeleCenter account.
● Click the User Guide option to download the full user guide.
● Click the Contact Us option to email the Customer Service Department.
● Click the Logout option to log out of iTeleCenter Online.
● Click the Tech Support option to chat with a Customer Service Representative. If a Customer Service Representative is not available, the Email option will be available for you to email a Customer Service Representative.


● Click the Inbox option to go to the Message Center.
● Click the FaxOut option to go to the FaxOut screen where you can send faxes.
● Click on the Reports option to go to the Reports screen where you can view your Call Reports.
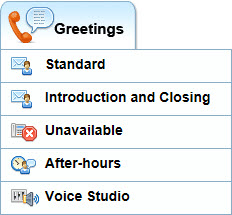
● The Greetings drop-down gives you options to configure your Greetings and set up the business hours (the hours your business is open).
● Click the Standard option to go to the Standard Greeting screen where you can configure your standard greeting (the greeting that plays when your business is open).
● Click the Introduction and Closings Greetings to go to the Introduction and Closing Greetings screen where you can set up these greetings.
● Click the Unavailable option to go to the Unavailable Greeting screen where you can configure your unavailable greeting (the greeting that plays when your caller is sent to voice mail).
● Click the After Hours option to go to the After Hours Greeting screen where you can set up your business hours and configure your after hours greeting (the greeting that plays when your business is closed).
● Click the Voice Studio option to go to the Voice Talent screen where you can place an order for a Voice Talent Professional to record a Greeting.
● Click the Extensions option to go to the Extension Boxes screen to configure your Extensions.
● Enter a new extension.
● Modify an existing extension.
● Delete an existing extension.
● The Manage Settings drop-down gives you options to manage your settings.
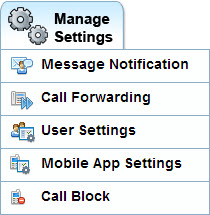
● Click the Message Notification option to go to the Message Notification screen where you can configure your Phone, Email and Text Message Notifications.
● With Phone Message Notification, you can configure your Message Notification settings.
● Enter your Message Notification phone number.
● Set your Message Notification schedule.
● Turn Message Notification On or Off.
● Select the events you want to be notified of.
● With Email Message Notification, you can configure your Email Notification settings.
● Enter your Email Notification address.
● Turn Email Notification On or Off.
● Select the events you want to be notified of.
● With Text Message Notification, you can configure your Text Notification settings.
● Enter your Text Notification Cell Phone number and carrier.
● Turn Text Notification On or Off.
● Select the events you want to be notified of.
● Click the Call Forwarding option to go to the Call Forwarding screen to configure your Call Forwarding settings.
● Turn Call Forwarding On or Off.
● Turn Do Not Disturb On or Off.
● Enter your Call Forwarding number(s).
● Set your Call Forwarding schedule.
● Click the User Settings option to go to the User Settings screen where you can update your settings.
● Change your passcode.
● Change your time zone.
● Edit your display name.
● Choose if you want to include Hang-up Calls in your Inbox.
● Choose the order that messages play on the Phone (Oldest First or Newest First).
● Choose if you want to allow Callers to leave a message on the main number.
● Set up your iTeleCenter number like another iTeleCenter number.
● Click the Mobile App Settings option to un-pair a mobile phone from the Mobile App. Note, this option only displays if you have a mobile phone paired with the mobile app.
● Click the Call Block option to go to the Call Block screen where you can configure your Call Blocks.
● Enter your Auto Call Block setting (the maximum times per day (between 1-99) a number may call your iTeleCenter number).
● Turn Auto Call Block On or Off.
● Add or delete blocked callers from the blocked callers list.
● Add or delete blocked area codes from the blocked area codes list.
● Add or delete excluded numbers from the excluded numbers list.
● The Power Tools drop-down gives you options to set up or access a conference bridge line, send voice broadcasts, view broadcasts and manage your broadcast lists.
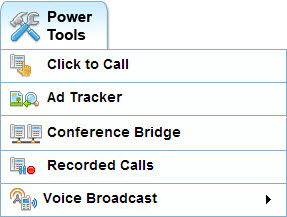
● Click the Click to Call option to go to the Click to Call screen where you get HTML code to paste to insert a Click to Call link on a web page or email signature.
● Click the Ad Tracker option to go to the Ad Tracker Greeting screen where you can set up your Ad Tracker greeting.
● Click the Conference Bridge option to go to the Conference Bridge screen where you can set up or access a conference bridge line.
● Click the Recorded Calls option to go to the Recorded Calls screen where you can listen to and save your recorded calls.
● Click the New Broadcast option to go to the New Voice Broadcast screen where you can send a voice broadcast.
● Click the View Broadcasts option to go to the View Broadcasts screen where you view and listen to sent voice broadcasts.
● Click the Manage Broadcast Lists option to go to the Manage Broadcast Lists screen where you can view, edit and add broadcast lists.
● The Resources drop-down gives you options to help you use your iTeleCenter.
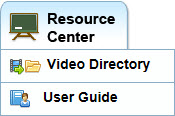
● Click the Video Directory option to access links to Help Video Tutorials.
● Click the User Guide option to get the latest version of the iTeleCenter User Guide.