Call Forwarding |
1. Select the On/Off setting.
● Select the On option to turn Call Forwarding ON.
● Select the Off option to turn Call Forwarding OFF.
2. Click the Save button to save your selection.
1. Select the On/Off setting.
● Select the On option to turn Do NOT Disturb ON. When Do NOT Disturb is on, Call Forwarding will be temporarily halted.
● Select the Off option to turn Do NOT Disturb OFF.
2. Click the Save button to save your selection.
NOTE: Your Unavailable Greeting will play when you have "Do Not Disturb" on.
● When someone calls - Select from the options available in the drop-down:
● Play My Standard Greeting: When selected, the caller will hear the Standard Greeting.
● Connect My
Caller Directly To Me: When selected, the caller will be forwarded immediately
(greeting will not play).
IMPORTANT NOTES:
If you have this option selected, your greeting will not play even when
Call Forwarding is turned off.
If you have this option selected, this turns OFF the ability to receive
faxes or dial extensions.
● Prompt callers to - Select from the options available in the drop-down:
● Record Their Name
● No Prompt
● Caller ID Display - Select the number to be displayed for Caller ID when calls are being forwarded to you. If your Calling Plan has “Favorites”, choose the (732) 463-6439 option, make (732) 463-6439 one of your “Favorites”, and you will not use minutes on your calling plan when you receive forwarded calls from iTeleCenter.
● Callers will hear (this is the recording your caller will hear while the system attempts to forward your call) - Select a hold music option from the drop-down or select "Custom" from the drop-down and upload a Custom music file for the hold music.
● To select the hold music for your iTeleCenter from existing options:
a. Select the music from the Callers will hear drop-down list.
● You can listen to a music selection by clicking on the speaker button next to the Music on hold drop-down list.
b. Click the Save button to save your selection.
● To upload a music file for your hold music:
NOTE: To ensure the best quality for playback, we recommend one of the following formats:
● MP3 (256 bit, mono)
● WAV (8000 Hz, 8 bit, mono PCM)
● WAV (8000 Hz, 8 bit, mono CCITT U-Law)
a. Enter the path for the recording file you wish to upload in the Upload a Custom Recording for my callers to hear text box or click the Browse button to find the file.
b. Click the Save button to save the uploaded music to the Music on hold drop-down list. It will be saved in the drop-down list as “Custom”. You may only have one custom recording. Uploading a new custom audio file will overwrite the existing one.
● To record an on-hold message on the phone:
a. Select “I will record my greeting on the phone” option.
b. Click the Save button to save selection.
Using the Phone, log in to your iTeleCenter and follow these prompts:
● Press 4 to Modify your Configuration
● Press 6 to Manage your Call Forwarding
● Press 5 to Record your On-hold message
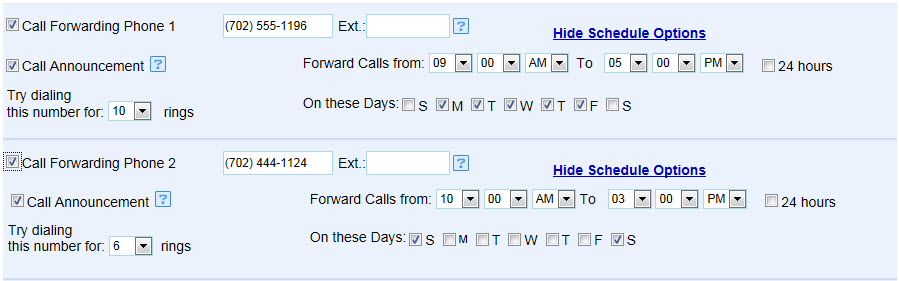
1. For each priority, enter the telephone number you want your iTeleCenter calls to be forwarded to. You can set the following for each number:
● Extension: Use this text box if your call is being forwarded to a number with an extension. If there needs to be a delay before the extension is dialed (because of an automated announcement), enter a comma before the extension number for each second you want to delay the dialing of the extension. (,,,123 will pause 3 seconds before dialing extension 123). NOTE: The call is answered when a call is forwarded to an extension, so the call will not forward to the next priority if an extension is called.
● Call Announcement: To turn call announcement off, uncheck the Call Announcement checkbox. When Call Announcement is off, callers will be connected directly to you when you pick up the phone. To turn call announcement on, check the Call Announcement checkbox. When Call Announcement is on, you will hear the following options prior to accepting the call:
● Press 1 (on the telephone keypad) to accept the call.
● Press 2 (on the telephone keypad) to send the call to voicemail.
● Press 3 (on the telephone keypad) to replay the caller’s name.
● Press 4 (on the telephone keypad) to hear the caller ID #.
● Press 5 (on the telephone keypad) to record a short message that the caller will hear before being sent to voicemail.
● Call Forwarding Schedule: Select the Start Time with an AM or PM setting. This is the time of day call forwarding will begin. Select the End Time with an AM or PM setting. This is the time of day call forwarding will end. Check the checkboxes for the days of the week that you want call forwarding on for. Uncheck the days you don't want calls forwarded to you on.
● Number of Rings: Enter the number of rings that you would like forwarding to try before calling the next number.
2. Click the Save button to save your entries.